FastAPI, React and Docker
I’ve recently been working on a fun Advent of Code project for work and using some new (to me) technologies like FastAPI and Docker for deployment. This post is a simplification of the project structure and deployment configuration I used (mostly as a reference for future me, but perhaps someone else will find it useful too). The focus is on project structure and deployment. This is not intended to be an interesting sample project for FastAPI or React.
See the full project on Github.
The overall project structure looks like so:
.
├── Caddyfile
├── README.md
├── venv
├── backend
│   ├── Dockerfile
│   ├── app
│   │   └── main.py
│   └── requirements.txt
├── docker-compose.yml
└── frontend
    ├── Dockerfile
    ├── package.json
    └── src
        ├── App.js
        └── setupProxy.js
A Basic Fast API Server #
The server component is written using FastAPI.
I picked FastAPI for several reasons:
- Python-based. It’s been a while since I’ve used Python for anything and wanted to refresh my skills.
- Simple. Writing APIs in FastAPI is crazy efficient.
- Documentation. The majority of the UI work for this project is being done by someone else. I wanted Swagger-type documentation for the APIs I created and FastAPI does that out-of-the-box.
In the project root I created a new Python 3 virtual environment (FastAPI requires Python 3, and honestly Python 3 has been a thing for the while now).
python3 -m venv venv
. venv/bin/activate
# venv\scripts\activate on Windows
I’ve broken the project structure into frontend and backend folders, so let’s start with backend.
Create a backend/requirements.txt with the required modules for FastAPI.
fastapi
uvicorn
And, install those requirements.
pip install -r backend/requirements.txt
Now, to create a really dumb FastAPI server. Here is backend/app/main.py.
from fastapi import FastAPI
from datetime import datetime

app = FastAPI()

@app.get("/day", tags=["Dates"])
def get_day_of_week():
    """
    Get the current day of week
    """
    return datetime.now().strftime("%A")
Now, from the backend folder we can run our FastAPI service:
cd backend
uvicorn app.main:app --reload
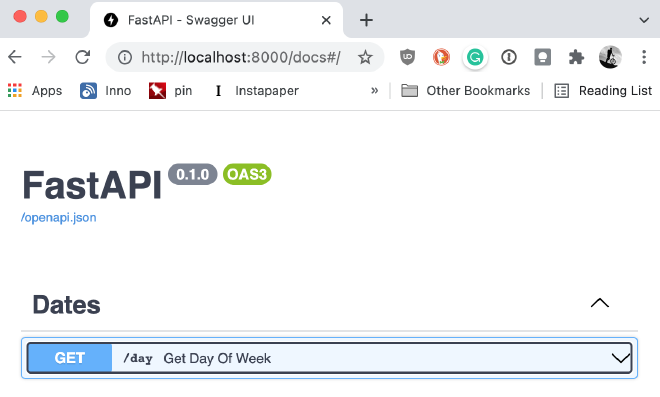
If you visit http://localhost:8000/docs you can inspect/test the new day of week API.

A Basic React APP #
Now to build a basic frontend app in React that calls the new API. For this, I used Create React App.
Assuming you already have a modern version of NodeJS installed, from the Project root…
npx create-react-app frontend
CreateReactApp creates a handy development server that serves the front-end application.
When I deploy this for real, I want everything to be housed under a single server with my APIs namespaced to /api so that I can make API calls to /api/day from my frontend code. To do this in development, we need to configure the React development server to proxy requests through to the FastAPI development server.
The built-in proxy functionality in CreateReactApp doesn’t support this URL tampering so we need to do that ourselves.
First, install the http-proxy-middleware with NPM.
cd frontend
npm install --save http-proxy-middleware
Next, create frontend/src/setupProxy.js and have it proxy requests to /api through to the FastAPI development server (stripping the /api prefix).
const { createProxyMiddleware } = require('http-proxy-middleware');

module.exports = function(app) {
  app.use(
    '/api',
    createProxyMiddleware({
      target: 'http://localhost:8000',
      changeOrigin: true,
      pathRewrite: {'^/api' : ''}
    })
  );
};
Now, we can replace frontend/src/App.js and call our new API to print out the current day of the week.
import React from 'react';

class App extends React.Component {

  constructor(props) {
    super(props);
    this.state = {
        day: ""
    };
  }

  componentDidMount() {
      fetch('/api/day')
          .then(response => response.json())
          .then(response => this.setState({'day': response.day}))
  }

  render() {
    return <h1>Hey!  It's {this.state.day}</h1>;
  }

}

export default App;
Make sure FastAPI service is running (port 8000) and start the front-end development service.
cd frontend
npm start
If you visit http://localhost:3000 you should see something like:
Hey! It’s Saturday.
Dockerizing the Server #
Dockerizing the FastAPI backend is fairly easy.
Create backend/Dockerfile
FROM python:3.9
WORKDIR /code
ENV PYTHONDONTWRITEBYTECODE 1
ENV PYTHONBUFFERED 1
COPY ./requirements.txt /code/requirements.txt
RUN pip install --no-cache-dir --upgrade -r /code/requirements.txt
COPY ./app /code/app
EXPOSE 8000
CMD ["uvicorn", "app.main:app", "--host", "0.0.0.0", "--port", "8000"]
You can test it builds with:
cd backend
Docker build .
Dockerizing the Frontend #
Dockerizing the frontend is a bit more complex since it has several parts:
- Build a production version of the React app (a bunch of static files)
- Fire up a HTTP server of some sort to serve those static files.
- Proxy requests to
/apithrough to my FastAPI container - Oh. And obtain some SSL certificates while we’re at it.
Create frontend/Dockerfile
# Build step #1: build the React front end
FROM node:lts-alpine as build-step
WORKDIR /app
ENV PATH /app/node_modules/.bin:$PATH
COPY package.json  ./
COPY ./src ./src
COPY ./public ./public
RUN npm install
RUN npm run build

# Build step #2: build an Caddy container
FROM caddy:alpine
EXPOSE 80
EXPOSE 443
COPY --from=build-step /app/build /usr/share/caddy
You can test it builds with:
cd frontend
Docker build .
Using docker-compose to test it locally #
Create Caddyfile with the configuration for Caddy (the webserver). In this case, we’re only binding to port 80 (so no HTTPS). All requests to /api are proxied through to the backend container.
:80

handle_path /api/* {
	reverse_proxy backend:8000 {
        header_up Host {upstream_hostport}
        header_up X-Real-IP {remote_addr}
        header_up X-Forwarded-Host {host}
    }
}

handle {
        root * /usr/share/caddy/
        try_files {path} {file} /index.html
        file_server
}
Then create docker-compose.yml to wire this stuff together.
version: '3.8'

services:

  backend:
    build: ./backend
    command: uvicorn app.main:app --root-path /api --proxy-headers --host 0.0.0.0 --port 8000

  frontend:
    build: ./frontend
    ports:
      - "8080:80"
    volumes:
      - ./Caddyfile:/etc/caddy/Caddyfile
      - caddy-data:/data
      - caddy-config:/config
    depends_on:
      - backend

volumes:
  caddy-data:
  caddy-config:
--root-path /api gives FastAPI a hint that it’s running behind a proxy so that the documentation works properly when accessed via. /api/docs/
At this point you should be able to run docker-compose up and get a running service listening on port 8080.
Automating Docker Image Builds #
Once the above is done and checked into a repo on GitHub, we can configure DockerHub to automatically build new images when the code changes.
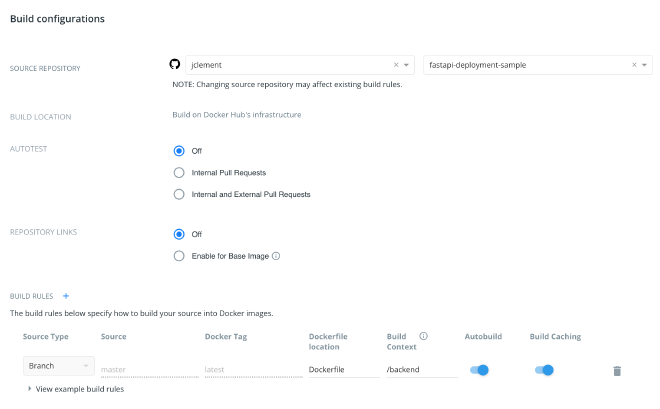
On DockerHub create a two new repositories. One for -backend and one for -frontend. On the Build tab for each of the new repositories click Configure Automated Builds.
- Link it to the Github repository with the project in it
- Ensure the Build Context is updated to
/frontendor/backendas appropriate to ensure we’re building the right Dockerfile for each image.

Production Deployment #
On a new VM with Docker and docker-compose deployed, let’s configure this to work for real (I’m using the domain demo.erraticbits.ca for this…)
Create /docker/demo/docker-compose.yml as:
version: '3.8'

services:

  backend:
    image: index.docker.io/jclement/fastapi-deployment-sample-backend:latest
    restart: always
    command: uvicorn app.main:app --root-path /api --proxy-headers --host 0.0.0.0 --port 8000

  frontend:
    image: index.docker.io/jclement/fastapi-deployment-sample-frontend:latest
    restart: always
    ports:
      - "80:80"
      - "443:443"
    volumes:
      - ./Caddyfile:/etc/caddy/Caddyfile
      - caddy-data:/data
      - caddy-config:/config
    depends_on:
      - backend

volumes:
  caddy-data:
  caddy-config:
restart: always to ensure this starts on system boot We’ve exposed port 80 and 443 so that TLS works properly
Create /docker/demo/Caddyfile as:
demo.erraticbits.ca

handle_path /api/* {
	reverse_proxy backend:8000 {
        header_up Host {upstream_hostport}
        header_up X-Real-IP {remote_addr}
        header_up X-Forwarded-Host {host}
    }
}

handle {
        root * /usr/share/caddy/
        try_files {path} {file} /index.html
        file_server
}
If you are running at the top-level of the domain and want to redirect to www, it would look more like this:
www.erraticbits.ca {
        root * /usr/share/caddy/
        file_server browse

        handle_path /api/* {
                reverse_proxy backend:8000 {
                header_up Host {upstream_hostport}
                header_up X-Real-IP {remote_addr}
                header_up X-Forwarded-Host {host}
            }
        }

        handle {
                root * /usr/share/caddy/
                try_files {path} {file} /index.html
                file_server
        }
}

erraticbits.ca {
        redir https://www.erraticbits.ca{uri}
}
And start up the frontend and backend services with this:
cd /docker/demo
docker-compose up -d
Automated Docker Updates #
We can then use Watchtower to automagically (every 180 seconds) keep our Docker images up-to-date when the images change on DockerHub.
Create /docker/watchtower/docker-compose.yml as:
version: "3"
services:
  watchtower:
    restart: always
    image: containrrr/watchtower
    volumes:
      - /var/run/docker.sock:/var/run/docker.sock
    command: --interval 180
And start the Watchtower container.
cd /docker/watchtower
docker-compose up -d
For private docker repositories it’s a bit more complicated:
- Login using
docker login - Pass the
$HOME/.docker/config.jsonfile into watchtower by adding a volume in thedocker-composefile for watchtower:
    volumes:
      - /var/run/docker.sock:/var/run/docker.sock
      - /root/.docker/config.json:/config.json
- If using Docker Hub, ensure that the images have the full page to the image (
index.docker.io/jclement/fastapi-...rather thanjclement/fastapi-...) or you’ll get authentication errors
Summary #
And that’s it for a super high-level overview of building a basic application with FastAPI and CreateReactApp, and then deploying it via. Docker in a reasonably automated way.